Most web-connected devices have the convenient ability to remember Wi-Fi networks you connect to everyday, along with networks you only link to on occasion. Macs and MacBooks are no exception to this rule, but what do you do if you own one a macOS machine and want it to forget a Wi-Fi network? Simple: Manually remove it from your computer altogether.
Wiping Wi-Fi info from your Mac’s memory is an easy feat to pull off, and we’ve created this guide to help you through the process. We built our instructions around macOS Sonoma (the latest OS), but the steps should apply to most versions of macOS.
How to forget a Wi-Fi network in macOS
Step 1: To get things started, you’ll first want to launch System Settings.
Step 2: Select Wi-Fi from the left-hand column.
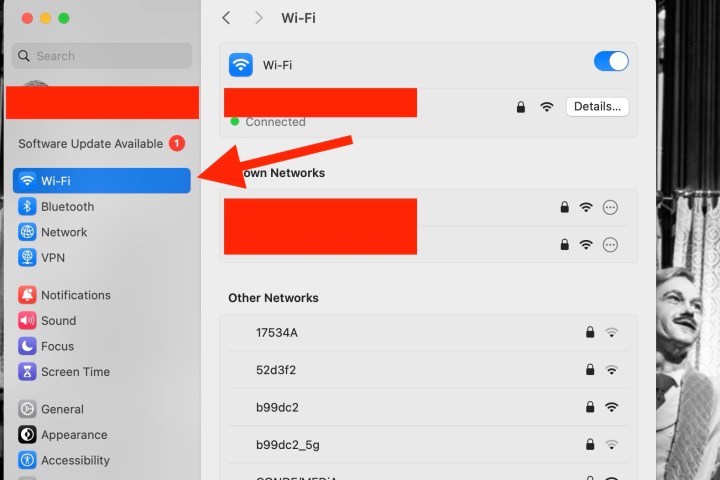
Step 3: If you’d like your Mac to forget the Wi-Fi network it’s currently connected to, click the Details button next to the network name. The Wi-Fi you’re currently paired to will be listed right at the top of the dashboard.
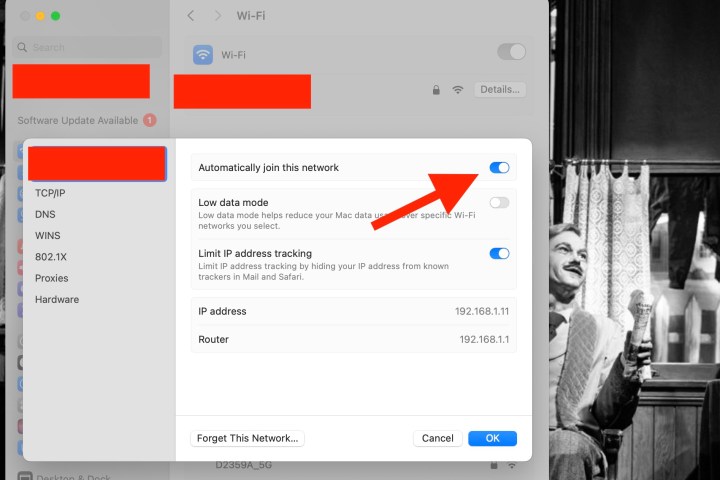
Step 4: In this next pop-up window, you’ll see the Forget This Network button on the bottom-left. Once you select this option, another pop-up will appear to inform you that any devices linked to this network via iCloud Keychain will no longer be supported.

Step 5: If you only want your Mac to stop automatically connecting to this Wi-Fi network (but you’d like it to remember it), you can simply toggle off the Automatically join this network slider at the top of this pop-up.
If you still want to manually forget the network, go ahead and click Remove.
A second method
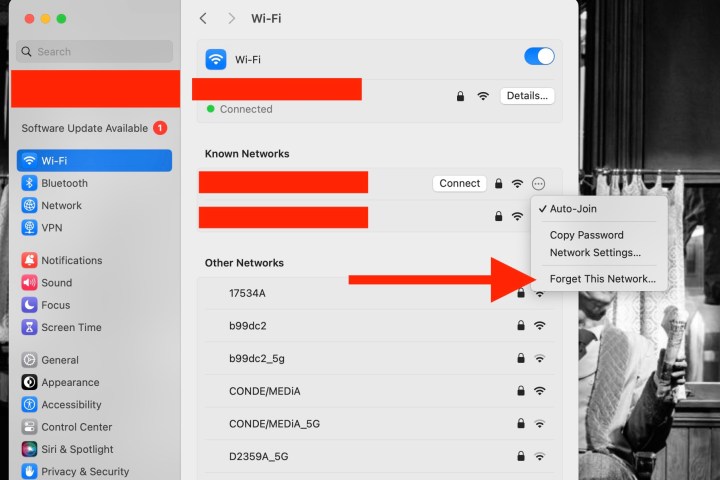
Step 1: Back on the Wi-Fi dashboard, your Mac will detect and list all Wi-Fi networks it recognizes under the Known Networks header. If you’d like your Mac to forget one or all of these networks, click the More button (an ellipses) to the right of each Wi-Fi name.
Step 2: The Forget Network button should be the last option in this dropdown. Click it, and if you’re content with waving goodbye to this network, finish things off by clicking Remove.
Do this for every Wi-Fi network you’d like your Mac to forget.
A more advanced strategy
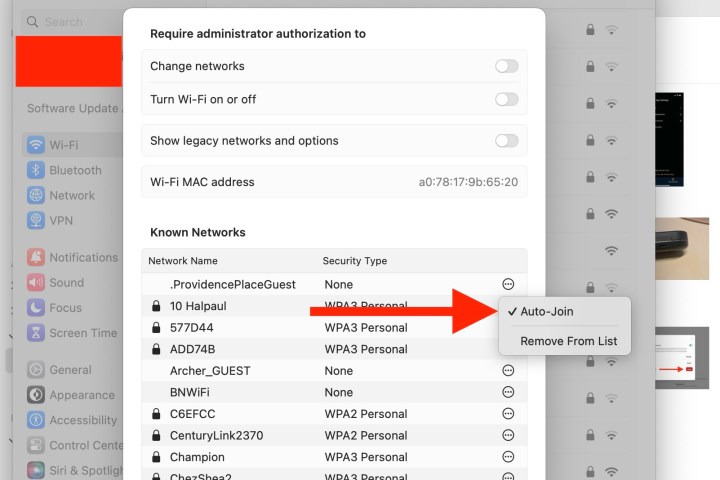
Step 1: If you want to see a list of every Wi-Fi network your Mac has ever connected to, click Wi-Fi, scroll all the way to the bottom of the dashboard, and then click Advanced.
Step 2: To remove any of these logged networks from your Mac, just click the More button, then click Remove from List.
Editors' Recommendations
- Best refurbished MacBook deals: Get a MacBook Air for $140 and more
- Best MacBook deals: Get an Air for $605 and save on M3 MacBook Pro
- 10 best desktop computers of 2024: tested and reviewed
- How to transfer photos from an iPhone to a computer
- iMac deals: New, renewed and refurbished iMac computers